
I am sure that this is a variation on how others do it. This a a basic technique. I was asked, though, so here we go:
1) Prep the figure
As part of the preparation process, sand the bottom of the figure with some coarse grit sand paper. This removes anything that will cause the fig to not sit on the base flat, and gives the glue something to grab on to.
2) Glue Figure To Whatever Base You Wish.
Super glue the figure to the base. I use Slotta style bases, fender washers, pennies; whichever suits the figure. FWIW, pennies and nickels are more cost effective than using the same size fender washers, if you are buying them at the DIY store; at least in my area.
3) Build Up The Base
If holes need to be covered up on washers, or the base needs to be built up to match base on the mini, now is the time to do it. I use a variety of things; JB Weld, Dry Wall Mud, and Sculpey to name a few. You can press bits of other materials into the base, before it hardens to add character. If you texture the base before it hardens, you can skip #4. Alternately, you can skip #3 and just go straight to #4.
4) Apply Base Material
Using an old paint brush, apply straight white glue, or carpenter's glue, to the base. Keep it off the figure itself, as much as possible. Once the glue is applied, dip the figure in a bucket of sand. I have a plastic gallon ice cream tub that I filled with road sand last spring that I use. I filtered all the big chunks and such out with a pasta strainer. I have enough sand to last me for years, at this point. Run your finger along the edge of the base to remove any extra sand that may have got on the edge. You can use an Xacto knife to remove any sand that got onto the figure itself.
5) Base Coat The Figure
After the glue has dried, base coat the figure. I use cheap Dollar Store Flat Black spray paint. I paint the figure and base at the same time. The paint will help adhere the sand to the base better than just the glue.
6) Paint the figure
Self explanatory, eh?
7) Paint The Base.
The colors I use vary, depending on the mini. The color scheme is always the same; Dark Color, Light Color, Dove Grey, Sand/Sable, Trim Color. Example; Dark Chocolate, Moccasin Brown, Dove Grey, Sand/Sable, Black. Applying these colors is a 5 step process:
1) Water down the Dark Color, so it will flow into all the nooks and crannies on the base. Apply it liberally to the base.
2) Once the Dark Color dries, heavily dry-brush the base with the Light Color.
3) Once that dries, lightly dry-brush the Dove Grey on the base. Apply it a bit heavier on larger bits that look like rocks, and such.
4) Once dry, very lightly dry-brush the Sand/Sable to the base.
5) Finally apply your Trim Color to the edge of the base. I use mostly Black, although it depends on the mini.
To speed things up at this point, I keep a cheap hair dryer next to my table that I use to dry the paint. On high setting, it dries craft paints remarkably fast.
8) Finish The Base
Take white glue and apply it randomly on the base. Dip the base into some Woodland Scenics Turf; basically finely ground foam; suitably colored. Next apply patches of Woodland Scenics Coarse Turf; ground up foam in bigger chucks, with glue and tweezers. The tweezers give you more control of how much and where it is applied. You can also apply static grass; I got mine from Gale Force 9, although it can be found in most train shops. I finish the whole thing off with a coat of cheap spray wood varnish, and then a couple of coats of Dul-Cote. This helps seal the mini, and keeps the base material from coming off.
Here are some examples of bases finished this way:
On Pennies w/ Just Sand And Flock/Static Grass:
(20mm Liberation Minis)

On a Slotta Base w/ Just Sand And Flock/Static Grass:
(Reaper Chronoscope Pulp hero)

On Fender Washers w/ Textured Sculpey:
(Artizen Cowboys)

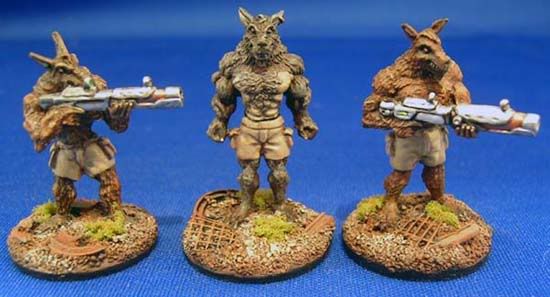
On Fender Washers w/ Added Bits
(MegaMinis Kanines; I think that's whose selling them now)
Very good tutorial. I have quite a few methods to choose from now. To base my own models
ReplyDeleteA very worthy post that should surely be of great help to many.
ReplyDeleteGreat tutorial!
ReplyDelete