
I had such a good time playing the games that Ambush Alley Games hosted at Fall Recruits (Lee's Summit, Mo) last month, I decided it had been WAY to long since I broke open any of their rules. With that in mind, I set about refreshing my memory on Ambush Z. Instead of Hometown USA, I've set it in the Middle East; just so I can break out some different scenery. Here's the results; enjoy.
Situation:
Situation:
A team of Scientists (aka Whiskey Charlies) has taken up refuge in a nearby building; due to a broken down vehicle. A US Army fireteam (Fireteam Blazer) is dispatched to rescue them.
Setup:
The board is setup per the scenario directions in the Ambush Z rulebook.
 | ||
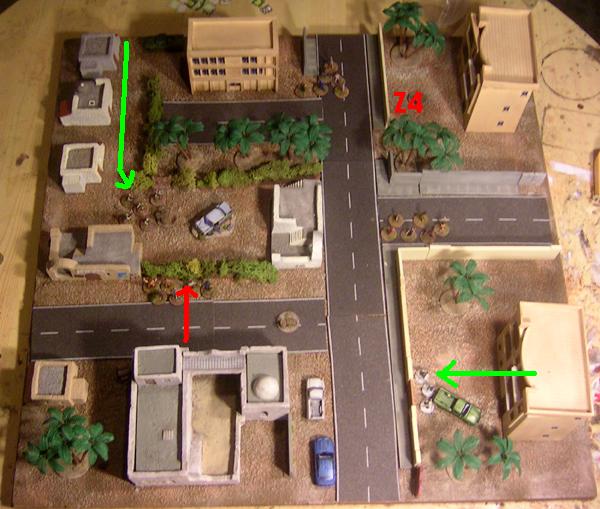
The board with Hot-Spots (HS), zombie units (Z#), the human Entry/Exit Point (E) and the target wayward Whiskey Charlies (X) |
Turn 1
Living Turn: Fireteam Blazer rapid moves 12 inches, into awareness zone of group Z3. It interrupts, but can't get through the hedge. Since the Whiskey Charlies can see Fireteam Blazer, they move from the building, cautiously to the gate of the compound.
 |
| The Whiskey Charlies move to the gate, anticipating rescue. |
Zombie Turn: All unmoved zombies mill around.
Zombie Reinforcements: Z4 (8 Zeds) appear by HS 1
Turn 2
 |
| End of Turn 1 |
Living Turn: Fireteam Blazer rapid moves 12 inches towards the small white shop to its front. Z3 interrupts Fireteam Blazers movement, but Blazer wins the Reaction Check (RC). Again, the zombies can't get through the hedge, so they follow Blazer’s movement down the hedge row.
 |
| Zombies looking for Fireteam Blazer |
(Game Note: I wasn't sure how to handle the situation. The zombies knew the living were there, but couldn't get to them on their interrupt. Conversely, the Living couldn't Def Fire on the Zs, but knew they were there. So, I had the zombies shadow the living unit down the hedge row, until they could attack.)
 |
| Fireteam Blazer makes its first kills. |
 |
| The humans take on the second wave of undead. |
Z6 interrupts and charges Fireteam Blazer. The humans are able to defensive fire and kill one zombie, before Z6 can enter melee (Gunfire Zombies: 0). Z6 is wiped out in one round of Close Combat.(Gunfire Zombies: 0). The Whiskey Charlies move to join Fireteam Blazer and become their dependents. Z1 see’s them cross the street and is able to activate. It advances towards the humans, but can’t reach them. Fireteam Blazer passes a Quality Check and is able to hold fire.
(Game Note: I didn't want Blazer to fire at the zombies, as I knew they couldn't reach them. I figured that in the heat of battle, though, there was a good chance that the humans would open fire a the advancing threat; hence the QC to hold fire.)
Zombie Turn: All unmoved zombies advance towards the sound of the recent gunfire.
Zombie Reinforcements: Z8 (5Zs) appears at HS1
 |
| End of Turn 2 |
Turn 3:
Living Turn: Fireteam Blazer moves cautiously, due to its dependents, back through the patio it had entered the street from. It is headed towards the exit point, and safety.
Multiple zombie units attempt to interrupt their movement; Interrupt Chain Z7, Blazer, Z1, Z4,Z5, Z6. Z7 charges into melee, and after 2 rounds of melee Z7 is wiped out. Wounded by a zombie, Blazer’s Grenadier becomes a dependent. (Gunfire Zombies: Z9 (9 Zeds) appear at HS2). Blazer passes the ensuing Morale Check for the wounded member. The rest of the interrupting zombies are only able to follow at a distance; unable to catch up to the humans.
 |
| The humans start to head to safety. |
Zombie Move: The remaining unactivated zombies move towards the gunfire; most of them just following the crowd.
Zombie Reinforcements: 0
 |
| End of Turn 3 |
Turn 4 (Zombie Quality Goes up to D8)
Living Move: Fireteam Blazer continues to move towards safety and Z1 tries to interrupt. Even with the Whiskey Charlies dragging the injured grenadier, the zombies are unable to catch up with Blazer.
The humans move into Z9’s awareness zone, activating it, but it can't get through the hedge (same situation as Turn 2), so it shadows Fireteam Blazer’s movement. Eventually, this movement takes Z9 to an opening that will allow it through.
 |
| Two Whiskey Charlies drag the wounded Grenadier to safety, while the rest of Fireteam Blazer watches the rear. |
Zombie Move: All remaining zombie units follow Fireteam Blazer's path.
Zombie Reinforcements: Z10 (5Zs) appear at HS 2
Turn 5
Living Unit: Fireteam Blazer moves towards the exit point. Again multiple zombie units attempt to interrupt; Interrupt Chain Z1, Z9, Z4, Fireteam Blazer, Z6. Z1 charges into melee. Caught off gaurd, Blazer is unable to Def Fire on the cahrging zombies. Blazer’s SAW gunner goes down in the first round of melee. Having survived the first round of melee, Blazer elects to flee Close Combat. It moves 6 inches away from Z1, which is directly towards the exit point. None of the other interrupting zombie units could catch up with the humans at this point.
Zombie Move: All remaining zombies move after the humans.
Zombie Reinforcements: Z11 (6Zeds) appear at HS4.
 |
| Turn 4 Movement and the End of Turn 5. |
Turn 6
Living Move: Fireteam Blazer moves off the map, as no zombie unit is able to interrupt it.
Aftermath:
Fireteam Blazer escorted the scientists to safety. Unfortunately, the Grenadier died from his wounds, and the SAW gunner was put out of action for a long time.
Aftermath:
Fireteam Blazer escorted the scientists to safety. Unfortunately, the Grenadier died from his wounds, and the SAW gunner was put out of action for a long time.
Victory Points
Tallying up the points in the Ambush Z rule book, it is obvious that the humans won (Humans 45, Zombies 3), no question.Game Notes:
It's been a while since I played Ambush Z, and I am positive that I screwed some things up. Two things I know for sure are:
It's been a while since I played Ambush Z, and I am positive that I screwed some things up. Two things I know for sure are:
1) I allowed the civilians to leave the house, before Blazer reached them. They could see the rescuing unit, so I think it was within the guidelines of the rules, but I am not sure it was within the spirit of the scenario.
2) The humans should have had to get into cover to asses their first causality on Turn 4. I didn’t realize this until after I had finished. I think the zombies most likely would have won had they done this. The zombies would have swarmed the building the next turn, and kept the humans from getting away. In any event it would have been a lot closer run thing than it was.
All in all I had fun getting to know the Ambush Z rules again.
Great batrep! Easy to follow, and I don't have the Ambush Z rules. I like the arrows showing the movement of the groups.
ReplyDeleteOh, great play area too!
looking good,fantastic terrain
ReplyDeleteEven though I don't know much about Ambush Z that was a most entertaining batrep. Excellent game board.
ReplyDeleteGreat looking game, and battle rep. Haven't tried Ambush Z myself, might have to have a look at it.
ReplyDeleteVampifan, Ambush Z is a great set of rules.
ReplyDeleteThis is a really good battle report, thank you for sharing
Nice report, gaming table looks brill!
ReplyDeleteNice report. Played the scenario two times. Both times my fire team was killed before they reached the barricaded building. The balancing is hard to tell, right or played wrong.
ReplyDelete